


Late one evening the lead designer of UNIT 13 came to my office and asked if I would like to join his team once SOCOM 4 shipped. I excitedly accepted his offer having no idea that doing so not only saved my job, but also allowed me to work on a title that would come to be the one I am most proud of in my career.
The
UNIT 13
Developed by Zipper Interactive
Published by Sony Computer Entertainment
North American Release Date: March 6, 2012
"TOBY AIN'T HERE"
~ ALABAMA, from UNIT 13 ~
Welcome to the UNIT!
UNIT 13 exploded onto the PlayStation VITA during its launch window with 45 unique missions, gamewide cooperative play,
and a plethora of scoring and performance challenges.
Instead of fitting into a traditional campaign the 45 missions of the game were self-contained and bite-size.
This allowed gamers on the go to get just the right amount of gameplay to fill a bus ride or lunch break without
needing to review story or progress details while gamers on the couch could still enjoy marathon gaming sessions
by playing as many missions as they wished.
To increase replayability UNIT 13 included a deep scoring system, support for two person cooperative play in every mission of the game,
and randomized missions.
As part of the PlayStation VITA platform support for the Near application was added to allow players to share High Value Target missions
while the Mission of the Day feature kept leaderboards ever changing!

Courtesy of Sony Computer Entertainment
Lucky Number Thirteen
My experiences as a designer on SOCOM 4 had been incredible, but by the time I joined design much of the game had already been created. With UNIT 13 I had the pleasure of working closely with two of the best artists in the industry to design levels, missions, and amazing experiences from scratch.
Systems Design Pre-Production
Once more into the breach!
The Journey Begins
Elite Status
When pre-production began on UNIT 13 I was still working on finishing up DLC for SOCOM 4; however, as time went on I was able to transition to the "Unit" and take part in gameplay and systems planning meetings and discussions. It was very exciting to finally be able to participate in making decisions rather than simply having to adhere to them.
One of the first major discussions I took part in was the redesign of the Elite game type. Each of the other game types had been well defined by this point, but the directors felt that Elite just didn't feel that unique. We discussed some variations that would work and as a team eventually came up with the two main distinctions that would make Elite a worthy game type: No checkpoints and No health regeneration.
I loved being a part of this process and couldn't wait to do more!
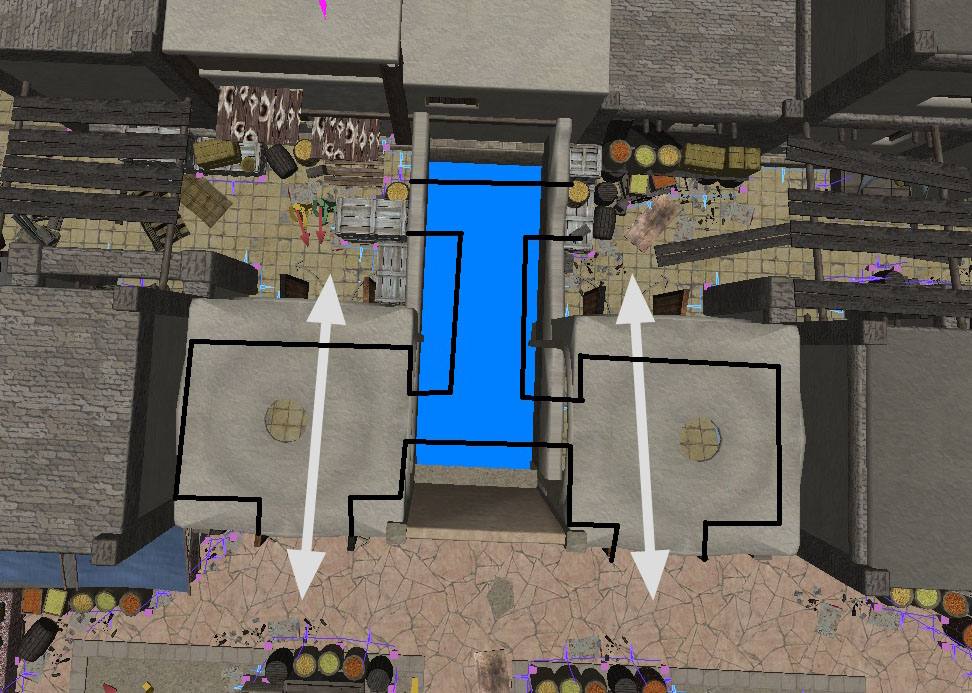
Co-Op Blockers
The cooperative gameplay of Instant Action had been the most successful part of SOCOM 4 and both the design leads and directors knew that Co-Op needed to feature prominently in UNIT 13. Unfortunately, due to the short production schedule for the game and engineering limitations it was quickly determined that both players in a Co-Op game would have to stay in the same encounter area.
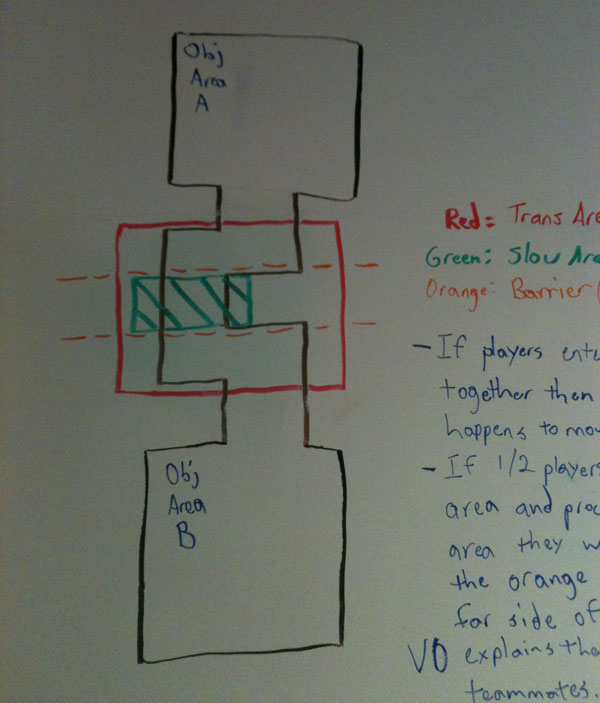
A tether style system of keeping the players together not unlike what was used in the original Halo: Combat Evolved was proposed, but this would have required engineering time that the schedule did not have. This was not that disappointing of news as many of the designers did not favor the use of such a potentially disorienting system. The call was then put out for ideas and I began planning out what would evolve into the Co-Op Blockers.
As I considered various ways to keep the players together I wanted to create something low impact that would not distract the players. I was actually hoping to come up with something that players working together might never even notice. The whiteboard painted walls of the studio filled with ideas and erase marks until I finally hit upon the the dual barrier system.
This system would use two linked barriers that would serve as a kind of long airlock between encounter areas. The idea was that once both players entered the airlock if either of them left from one entrance then the other would be sealed. My hope was that if players were moving together they might not ever even see the barriers!
Another potential advantage of my idea is that it didn't need any additional engineering support. Everything needed to make the airlocks function was already available in the scripting system.
In the end my crude whiteboard drawings were not all that different from the final system that was put in place. The technical designer did a great job of adding the "airlocks" and even made it easy for them to have more than two entrances. While the final Co-Op Blockers are a bit more visible in actual gameplay than I had hoped, the system works well and I am proud to have been a part of its inception.
Standing Stance Removal
The VITA may have added two touch screens but it lost four physical buttons in the process. Though the design leads came up with clever ways to convert the functions of some of the lost buttons to touch even their best plans ended up needing one more button.
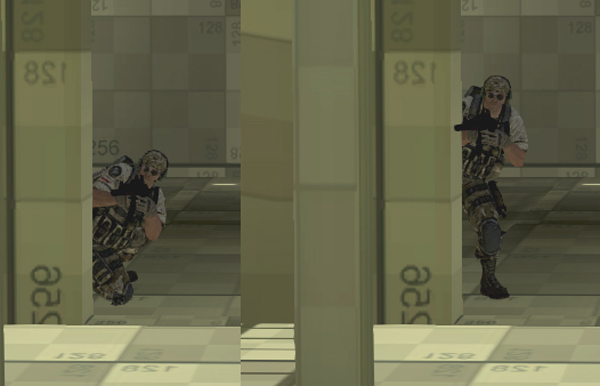
It was suggested that removing stances from the game might be a good way to free up a button. This also came with the bonus of reducing complexity, as players would no longer need to worry about choosing the best stance for the situation.
Removing the prone stance was easy, as it did not affect interactions or cover. The standing stance, on the other hand, had the potential to cause a great deal of problems if removed. As I had a good knowledge of cover and movement in SOCOM 4 the lead designer asked me to put together a comprehensive list of all actions that either used or placed the character in the standing stance.
I created a spreadsheet containing all the actions, what stances they could be triggered from, and what stance they would place the character in upon completion. This document also included comparison images showing the difference between standing and crouching cover on the same object.
Through my research I discovered three cases in which important actions would place the character into the standing stance. I reported all of this along with visuals and videos, giving the leads all the ammo they needed to move forward with their plan.
Scoring System
Once I had wrapped up all DLC work on SOCOM 4 the lead designer asked me to get some ideas together for different types of scoring and ways of displaying this information on screen in the UI.
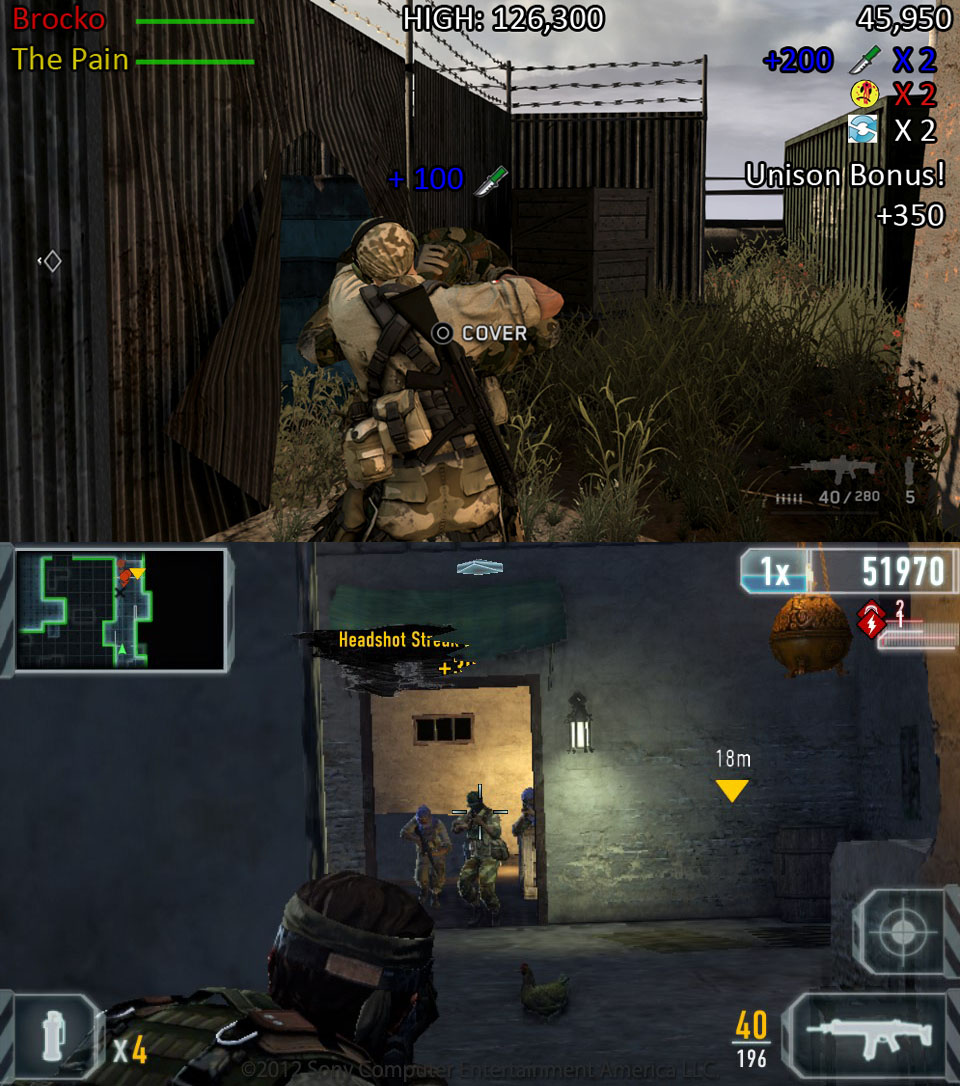
I started this task by researching a great number of existing games that featured any kind of scoring, such as BulletStorm, inFAMOUS, and Kameo: Elements of Power. As I looked at these games and others I focused on the actions that resulted in scoring, how the game communicated scoring to the player, and how/if the game explained its scoring.
Next I superimposed screenshots from some of the games onto an image of the VITA to get a feel for how their scoring UIs might work on its smaller screen. Through this process I started to identify the best places to locate scoring UI elements for maximum visibility without adding distracting amounts of clutter.
I then created animatics to present my ideas on scoring to the lead designer. I began by placing the scoring multipliers in a column near the top of the right side of the screen. This was done so that these important elements could remain on screen for as long as a scoring streak continued without blocking anything or becoming a distraction. Active scoring indicators went above the player character's head so that current accomplishments could be easily seen without getting in the way or requiring the player to look away from the center of the screen. Finally, I showed off some suggestions for ways that the player could use the touch screen to modify scoring UI elements. One example was to display on screen details about what the multipliers meant if they were touched.
After presenting my mockups and animatics it was time for me to move on to level design. While the lead designer would go on to add a great deal of depth to the scoring system by creating numerous scoring scenarios I was very happy to see that all the positioning suggestions that came out of my research had shaped the scoring UI, as both the multipliers and active scoring info were placed in the locations I had recommended.
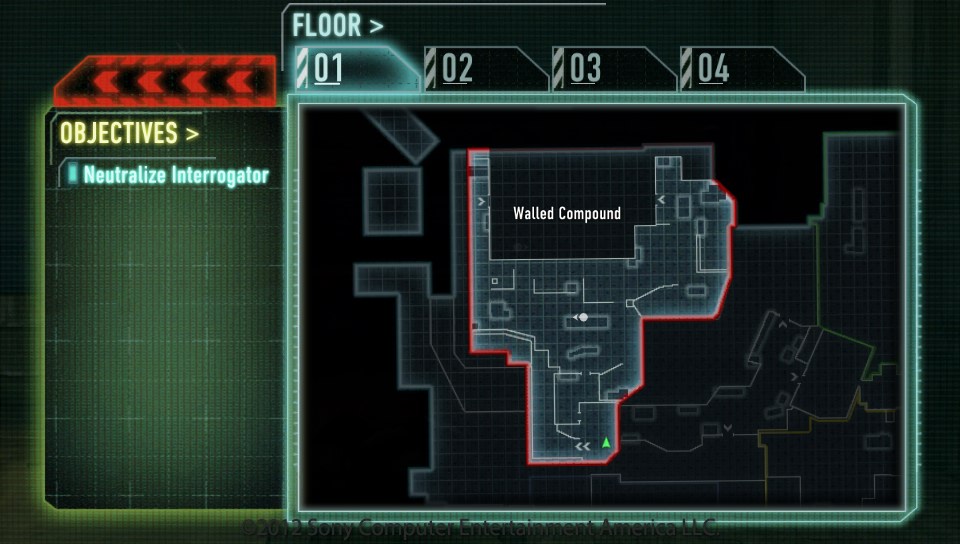
Level Design COMPOUND
All it takes is one sentence...
Small Scale, Big Fun
The lead designer kicked off the start of level design by presenting a demo level consisting of a single encounter area to the designers and artists.
A lot of thought and research had gone into the demo level. It was not just an attempt to do a SOCOM game on a portable, but a genuine effort to make a third-person tactical shooter feel right on the small screen of the VITA.
Working with new hardware and the aggressive schedule of UNIT 13 also shaped the demo level as initial estimates from engineering suggested that maximum active enemy AI numbers would be limited to single digits.
All these factors and many more led to demo level's lone encounter area being scaled down and limits were imposed on sightlines. This was done to create a cozy but not cramped game space in which enemies would never be so far away that they would consist of just a few pixels on the VITA screen and areas would never feel empty despite the relatively low number of enemy AI.
Production levels would then feature three to four of these small scale encounter areas connected by any number of transition areas to form levels that felt as large as those found in a typical home console game.
Setting the Stage
Five game types with two modes were planned to bring varied gameplay to the encounter areas in each level:
Direct Action - These missions would use all the encounter areas and often featured more story based objectives.
Covert - Stealth focused missions in which getting caught would result in failure. They commonly only used one encounter area.
Elite - A hardcore mode in which the player must complete objectives in two encounter areas without the benefit of automatic health regeneration or checkpoints.
Deadline - Timed missions in which two to three encounter areas are used. The clock is always ticking, but extra time is awarded when the player completes an objective and moves to the next encounter area.
High Value Target - Special missions in which any number of encounter areas must be traversed in order to locate and take out a named enemy. These missions were designed to be the hardest in the game.
Every level would also support ranked and dynamic versions of all these missions, with the exception of High Value Target which was ranked only.
A ranked mission was essentially a static mission in which nothing would change when replayed. These missions featured ranked leaderboards as everyone would have the same opportunities to try and get the highest score.
Dynamic variants would use scripts to randomly select insertion/extraction locations, enemy AI, objectives, and encounter area usage to create a unique mission.
When considering the initial designs of the levels we were directed to focus on the ranked missions while keeping plans for dynamic variants in mind.
The Dream Team
After the presentation of the demo level and game types, environment teams were formed of an asset artist, an environment artist, and a designer. I was extremely blessed to be paired with two of the most talented artists in the industry, both of whom I had had the pleasure of working with on multiple titles in the past.
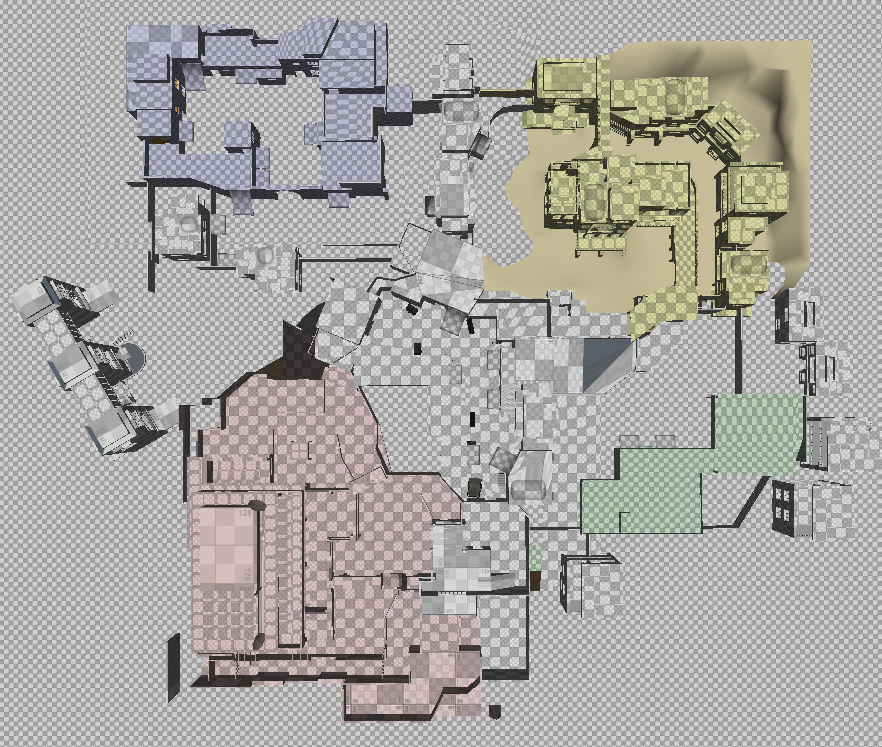
Each team was given a single sentence from which to create their level. While I cannot recall ours word for word it was something akin to "a compound in which a prisoner is held located in a Middle Eastern locale."
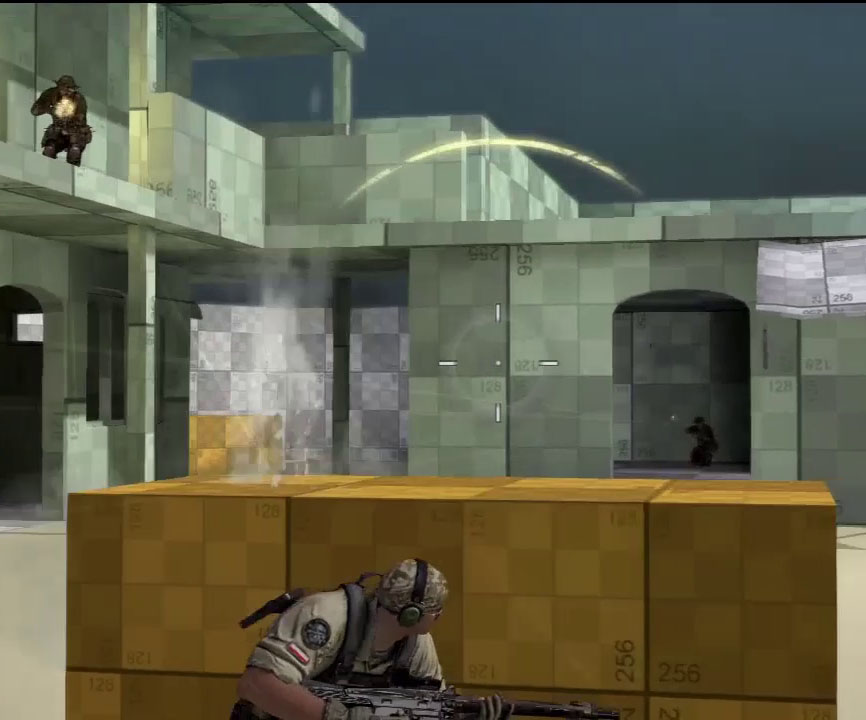
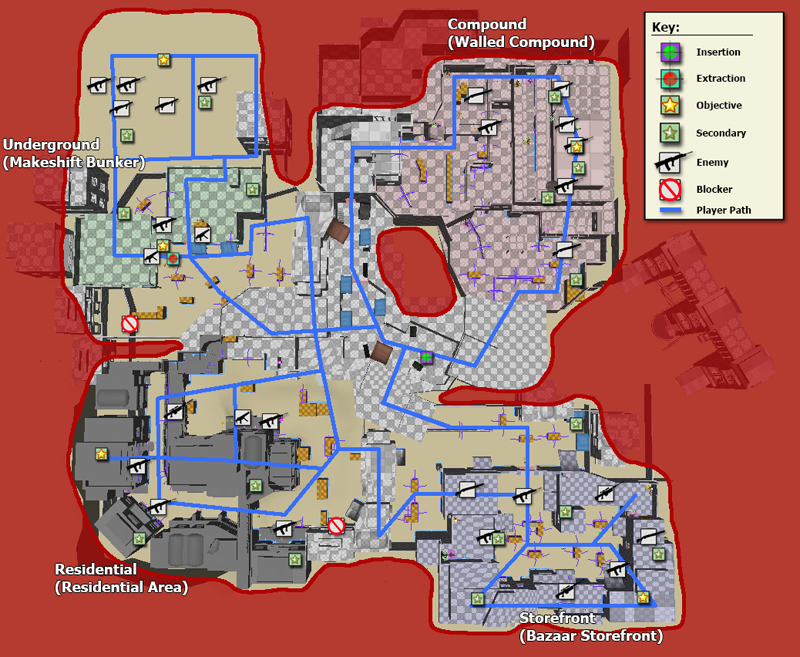
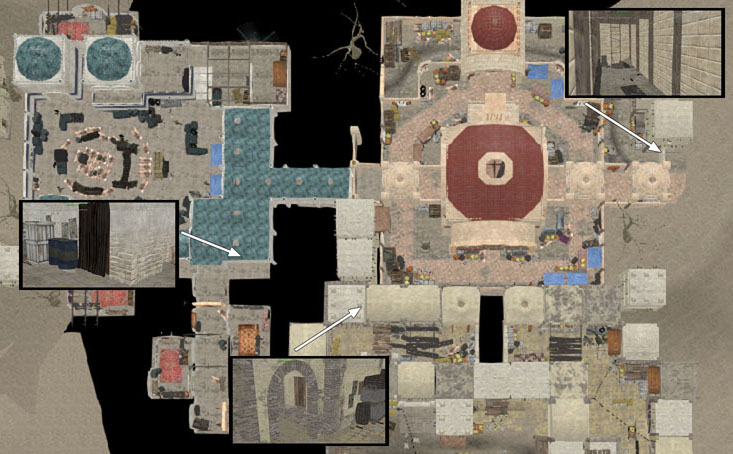
And with that we set about deciding what would work well for encounter areas. After some research and discussion we added the Bazaar Storefront, Makeshift Bunker, and Residential Area to the ubiquitous Walled Compound to give us four encounter areas.
With the encounter areas determined we set about experimenting on the whiteboard to determine basic layouts, how they would fit together, and where transitions would be needed. Once we were happy with the basics I began creating objectives and light fiction for the missions while the artists continued to block out the spaces and create large assets.
As we worked on this a new directive came down from management. To help with the compressed schedule simple asset creation would be outsourced to another Sony company. A lot of the work for this fell on the artists, so to help them as much as possible I collected reference images of the assets I would need for cover objects and objectives as well as reference for items that the levels might feature while they filled out the outsource request forms.
Colors in a World of Gray
While working on the encounter areas an additional technical limitation was discovered and all the environment teams were told that we had to make sure that no sightlines in the game were longer than a certain distance.
At this time most of the assets in use in all the environments were gray "Lego" pieces, so this task was a bit of a concern. I immediately asked the environment artist I was working with how hard it would be to color all the gray assets in each encounter area and he said no problem. I then suggested we use red, blue, green, and yellow for each encounter area while leaving the transitions alone, as they were exempt from this rule. This would allow anyone to enter an encounter area and easily find any problem areas just by looking for any sign of another color.
By the next morning our environment was recolored and by the end of the week every other environment team had followed suit. Everyone was easily able to find any problem areas and what originally seemed like a crisis was averted.
Although these colors were applied only to the basic "block out" style of textures used early in development the new art director actually resurrected this idea for the final game. Each encounter area still has a color, but it is more subtle. Many assets within the area will have a splash of the color, like the stripe on an oil barrel or graffiti on a wall, and the outlines on the TAC-MAP will feature it as well.
Rude Awakening
It wasn't long before the encounter areas were ready for temporary enemy AI and objectives. I wasn't implementing true missions at this point, but snippets of gameplay in order to prove that the encounter areas could support the intended gameplay and be fun to play. This was about the same time director reviews began, and unfortunately for us the first review did not go very well. Our encounter spaces were deemed too large and the directors felt that things just didn't work.
As a team we reviewed the encounter area featured demo level and made changes based on the feedback, but sadly the second review was not much better. I felt like many of the problems were my fault from possibly still having too much of a SOCOM 4 encounter and space mindset, so I asked the lead designer if he could spare some time and go over the demo level and our "Compound" level with me.
Despite being incredibly busy the lead designer walked me through a lot of problems and helped me to understand where I was going wrong. He also took the time to meet with the artists and with his guidance in mind we began preparing for the next review.
Don’t Call It a Comeback
The artists made a lot of great changes to the encounter areas without compromising the gameplay spaces we had originally created and I reworked the enemy AI to fit in the spirit of the demo level. Things felt a lot better, but something was still missing...
That something was cover markup. The levels were still so early that no team had been adding this, as it would surely be wasted work should art changes need to be made. Luckily our team had a cover markup expert, and I started going through all the encounter areas adding cover assets, markup, testing the results, and then changing anything and everything until it felt right. By the time I finished testing and checked everything in the next review was only about 16 hours away.
The next day, err, later that morning when I returned to work I told the artists of what I had done and they grabbed the new level from source control to check it out. We were all pretty excited about how our work had come together... but we had felt similarly before that first review.
As we entered Conference Room 6 for the review it was devoid of energy and one could almost see the gloom hanging in the air. The directors were expecting disappointment, which is not unthinkable considering the results of the previous reviews.
Our level loaded up and I started visiting the encounter areas as the artists narrated. Jaws dropped as I navigated appropriately sized spaces, pushed up to cover, engaged well placed enemy AI at expected distances, and then slid across cover to press the attack.
By the end of the review the feeling in the room had turned from sour to unrestrained exuberance. Everyone was impressed and there was serious discussion by the highest ranking directors on whether or not to use our environment for an upcoming progress demo to Sony. Sadly some special art polish had already been ordered for the environment originally chosen and so it was too late to replace it, but my team and I didn’t mind this at all.
The three of us walked out of that conference room feeling amazing. To add "compliment to care" it was Friday and it was EOD on a day I will never forget.
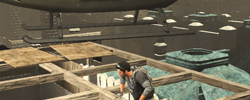
Mission Design Marhaba Bazaar
...to create an amazing level with hundreds of possible missions.
Mission Control
With our level approved I could finally go full steam ahead on the missions. As directed I had been planning the ranked versions of the standard game types when working with the artists to create the level and so the layouts and enemy AI for these missions came together quickly.
The dynamic missions were actually not that much harder to create due to the clever way in which we handled enemy AI for the ranked missions. At least four sets of general enemy AI were placed for each encounter area and specialized enemy AI were placed with each objective.
A specific set of general enemy AI and objective were then bound to each ranked mission, while all the sets and objectives were added to pools that dynamic missions would randomly choose from.
With just two objectives this system allowed for eight random enemy AI combinations, and these enemy AI did not need to be static. They could be set to randomly select patrol paths or perform special actions, making even the same set appear to be more than one. Designers could also add more general sets or objectives to a level to further deepen this pool of potential randomness.
Each encounter area also had reinforcement enemy AI that would activate if the player was detected before entering the objective area in all game types except for Covert. While these enemies were generally static based on the layout of the encounter area, their actions were often unpredictable and they added just a bit more randomness.
This system of randomness and enemy AI setup was not all that different from what I did for Instant Action / Co-Op in SOCOM 4, so it was very easy for me to place and tune enemy AI for all the encounter areas and objectives.
My stealth experience in SOCOM 4 and as a gamer also led me to test out all the random enemy AI combinations in my dynamic Covert missions. Any general set of enemy AI or objective that didn’t work was pulled from the pool of randomness and some unique general sets were created to ensure that every dynamic variant could be completed without breaking stealth.
Mission Upgrades
Setting up the mission layouts and initial enemy AI was only half the battle. Here are some of the other important parts of making the missions work that I needed to set up and maintain:
Enemy AI Sleeper Zones
The ability to put enemy AI to sleep made a welcome return in UNIT 13.
A sleeping enemy AI is essentially disabled,
and this is an important concept when the number of enemy AI that can be active at once is limited.
The term sleeper zone can feel a bit backwards, as the enemy AI within a sleeper zone only sleep when the player is NOT inside the same zone.
Engineering and tools did a great job of making this system easy for designers to implement. We simply needed to draw a sort of "line" around a zone in which we wanted the enemy AI to be awake, or active, when the player is present. Once the zone was created any enemy AI residing within it were then associated with it via visual scripting.
Sleeper zones did need to extend slightly into transition areas so that the player would enter the zone and wake up its enemy AI before they could be seen napping on the job. It was also very important to not allow sleeper zones to overlap, as this could allow too many enemy AI to be awake at once.
Commonly, each encounter area only needed one sleeper zone setup, but it was possible to have more than one if needed.
Enemy AI Restriction Zones
These zones served as invisible fences to the enemy AI, and were placed to ensure that they never wandered into transition zones.
Although implemented in the same manner as sleeper zones, it was not uncommon to have multiple restriction zones in the same encounter area.
I "unintentionally" found a lot of ways for enemy AI to escape their associated restriction zones and set up several test levels to show engineering common cases in which the zones would break. Through working with the engineer responsible for this system many global fixes were made that eliminated countless instance bugs.
Access Denied
Early on we had access to placeholder blocker walls that simply said "CLOSED".
These could be placed throughout the level and scripted to turn on when a specific mission was loaded to block pathways.
Setting these up was a breeze, but the real heroes here were the artists. Every placeholder blocker needed an asset, and while most were doors I had a couple large blockers that needed believable assets. The asset artist on my team created amazing dynamic assets to use as the final blockers and I was happy to update the scripts to use them.
Co-Op Blockers were also placed in the same manner, but as these shared a single asset throughout the entire game my team’s artists were spared additional work.
Are you threatening me?
At some point during the mission design phase of Marhaba the weapon designer presented us with various threats.
These included security cameras, laser tripwires, alarms, mines, and similar items.
Alarms were required to be placed in every encounter area of every level and they functioned automatically with the enemy AI and needed only light scripting to associate them with cameras and tripwires.
The addition of these threats was great as it allowed the pool of randomness to deepen a bit more for the dynamic missions, and they added new tactical concerns to ranked missions as well.
Closémon - Monster in the Closet?
Not long after the addition of alarms, the leads felt that there should be some sort of "cavalry" enemy AI
that would appear to have come into an encounter area once its objective was completed if the player had been detected or set off an alarm.
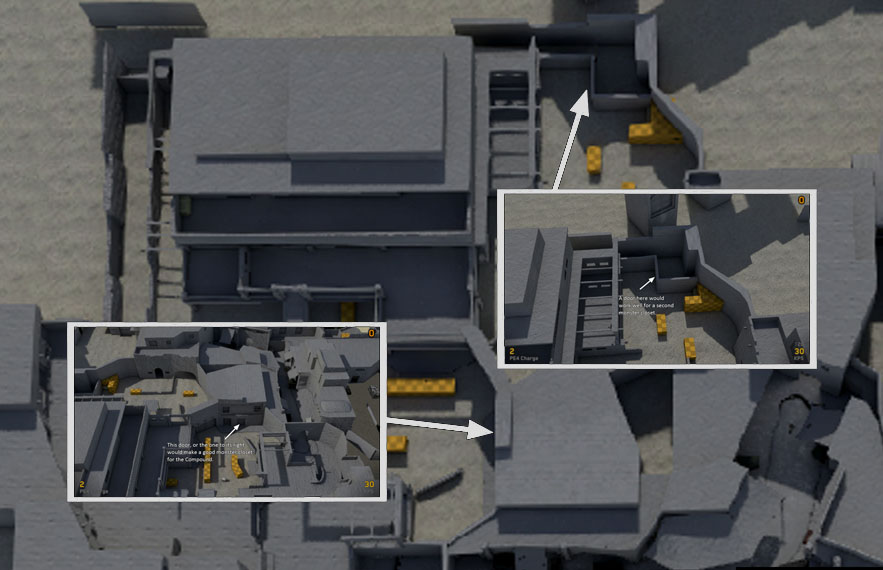
To add these enemy AI without upsetting other systems it was decided they would spawn in and emerge from "monster closets" located along the perimeter of an encounter area. While the concept of the monster closet can feel a bit gamey, ours was designed for maximum believability. Cavalry enemy AI would only spawn once and the monster closets were meant to look like areas where a guard might have been napping.
To this end designers were tasked with identifying locations along the perimeter of each encounter area where cavalry enemy AI could believably come from, like doorways or alcoves.
I knew this would put a lot of work on the artists, so I found multiple existing doors, closed off rooms, and potential alcoves in each encounter area and created a detailed image showing the entire level with inset images showing each location where I felt a monster closet could be easily made. Whenever possible I gave them multiple options as well.
Once again the artists were the real heroes and gave me all the monster closets I needed along with animated doors. Placing and scripting the cavalry enemy AI was a piece of cake and the task was complete.
Scripting!
I have gone over a great number of items that were needed for the missions to function, and yet there are many more.
There were zones to create the AI navigation mesh, patrol paths to lay out,
as well as a player navigation mesh and TAC MAP regions to boot!
But nothing compares in scope to scripting. A lot of brilliant things were put in by all the designers to make things easier, but there was still a lot of scripting to do. Every mission variant, every trigger, every enemy AI, every population control, every behavior override, every objective, every voice-over, every cinematic, and every little thing that doesn’t come to mind right now had to be hooked into each other for everything to work right.
Our scripting system was visual, but it did allow for the creation of variables and loops. To the more technical I would compare it to writing an application in which you could only call a set of existing functions. But this is not a complaint. Considering the sheer number of visual script objects myself and the other designers manipulated, I think this was the best system to use to get all the scripting done in time.
(For more details on the player navigation mesh and TAC MAP please take a look at the articles under the Design On Demand - Support category.)
Mission Memories
As with any project there were many challenges and changes along the road to completion. Here I would like to touch on a few that I remember best:
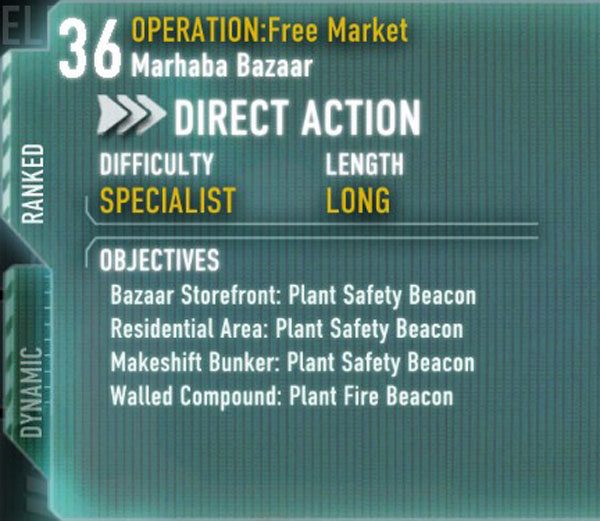
Direct Action "Free Market" Ranked Objectives
The original objective of the Walled Compound area was to rescue and escort a captive to extraction.
This objective had been shaped by the single sentence the level was created from,
but unfortunately engineering was unable to support friendly AI escorts.
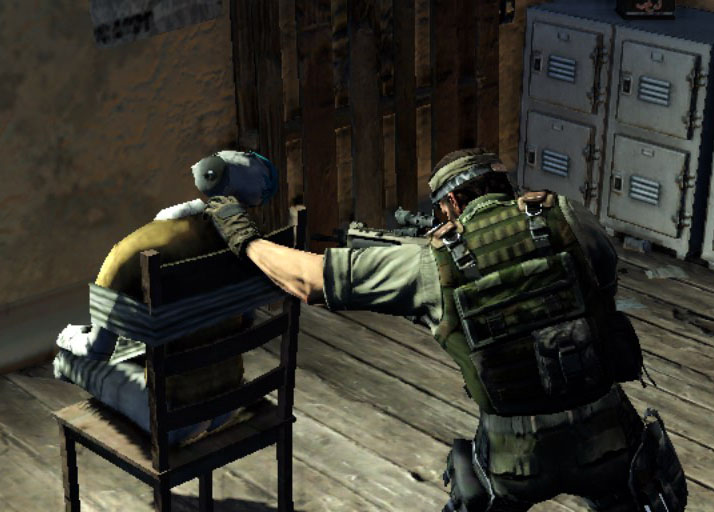
The Walled Compound had already been designed with a room for the captive to be held in, so I proposed having a mannequin serve as a dummy prisoner for the player to find. In my mind I wanted the player to find this mannequin and have the head fall off as their character reached for it and exposed the ruse. The cinematics team brought my vision to life perfectly and gave the mission the distinction of being the only one with a mid-mission cinematic.
At the time I made this decision Uncharted 3: Drake’s Deception was still months away and I had no idea they had planned something similar. Upon discovering their mannequin and telling me about it the technical designer literally commented, "I guess it’s a case of great minds thinking alike."
The new mannequin objective worked well, but the mission still needed a reason to send the player through the other three encounter areas. Rather than make the mission a linear battle to the Walled Compound I created a new series of objectives involving targeting beacons.
These beacons were designed so that the player would need to place no-fire versions in the civilian inhabited areas around the Walled Compound and a targeting beacon within.
This objective and mannequin were blended together perfectly by the mid-mission cinematic, as it concludes with the character planting the targeting beacon right in the mannequin’s lap.
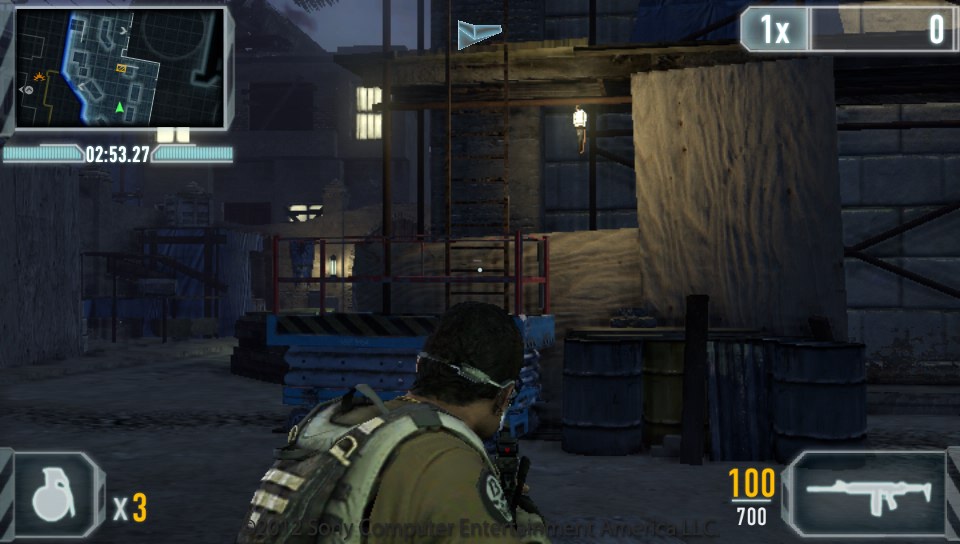
Covert "Crazed Bullet"
At some point during the level design phase I had asked the asset artist to make the topmost floor
of the compound building hidden from the rest of the area.
My plan here was to allow for two encounter areas within one in order to double the maximum amount of AI I could use.
Naturally, the topmost floor would never need so many enemy AI in a Covert mission, but by having separate pools the courtyard and lower floors of the compound building could feel more evenly occupied.
I also created the broken security camera asset with the weapon designer for this mission. My goal with this was to let players know that cameras could be disabled and that they existed in game. So I placed one in a very obvious spot so that players would easily see it early in the mission.
Due to an unfortunate change made to the Makeshift Bunker area I had to leave this mission with placeholder enemy AI longer than originally planned as I handled damage control. I finally got back to it, but unfortunately one of the senior designers had already played all the Covert missions and was justifiably disappointed.
I assured him that good changes were coming and what he saw was largely placeholder. I then reworked all the enemy AI, their patrol paths, and even some of the threats to make the mission a worthy successor to my work on Revelation in SOCOM 4 and add some new obvious and hidden scoring and chaining opportunities.
After playing the updated mission the senior designer was very impressed and congratulated me on the improvements. It even went on to become a favorite among the team and was used by the creative director in the first press showing of the game type.
Deadline "Merciless Cobra"
Nothing terrible or catastrophic occurred in the development of this mission,
but its finale was drastically improved through the observation of playtesters.
Once several of the missions were at beta levels of completeness, management arranged for the public to playtest UNIT 13 and the design team was invited to watch these sessions. I came and took notes on multiple items I noticed as my missions were played. Happily, most were minor issues or things I had already addressed.
One issue, however, was distressing to watch: playtesters consistently failed to locate the ladder leading to the rooftop extraction point at the end of the "Merciless Cobra" Deadline mission. The mission timer would run out as they searched, and to add insult to injury sometimes this happened as they were climbing the ladder.
This had to have been unbelievably frustrating for the playtesters, as they had finished all the hard parts of the mission only to fail at the end over something trivial.
Upon returning to my desk I immediately moved the extraction point trigger from the rooftop to the area around the base of the ladder. (I also blocked access to the ladder, but that was for another reason!) When the next group of playtesters came in no one had a problem reaching the extraction point, and by keeping it near the ladder the rooftop extraction cinematic is still believable.
High Value Target "Scorpion Crush"
From the unique insertion on the third floor of the compound building
to the linear path that forces the player to travel through almost every inch of the level to the rocket launcher fueled finale,
I had a lot of fun setting this mission up to be unforgettable!
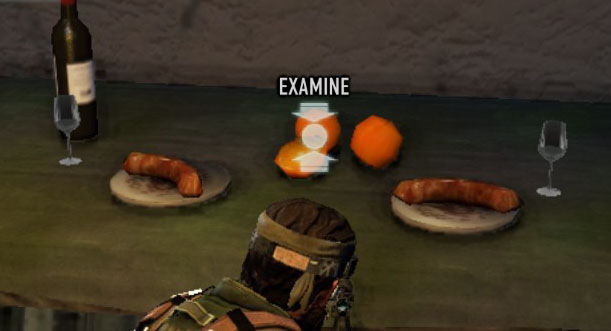
By working with the asset artist on my team I got to add one more memorable feature.
I don’t remember all the details, but I think the asset artist had set up a table in an unused alcove near the Bazaar Storefront area. Upon seeing this I asked him how hard it would be to create assets of sausages and a blood orange, which were both hidden collectibles in previous SOCOM titles. Naturally, he said it would be easy and so he added them and set the table up nicely with wine glasses and a bottle.
Next, I added scripting so that the door to this alcove would only open as the player walked through a trigger just past it, and this trigger would only function in this High Value Target mission. The player would never see the door open, but I made sure they could hear it in hopes of luring them back to discover our little Easter egg.
After showing this to the lead and technical designers, they found it so amusing that they asked me to put an interactive objective on it and script it to unlock the "Blast From the Past" trophy.
Dynamic Mission Objectives
When creating dynamic mission objectives I tried to make things more interesting in various ways.
Sometimes I would throw in a bit of humor, like with the "Destroy Mainframe" objective.
This is meant to be a bit humorous as the "mainframe" turns out to be an old PC tower.
With "Neutralize Enemy Explosives Expert" I added a hidden secondary aspect to give stealthy players an alternate way to complete the objective. If the player can reach the bomb console without being detected they can sabotage it so that it will explode the next time the explosives expert interacts with it. Alternately, if the player blows stealth and tries to sabotage the bomb console then it will explode right away.
Life in Marhaba
Working on this level and its missions from start to finish, with two fabulous artists and the support of other designers, was one of the best experiences of my professional career.
Thanks to all the great people I had supporting me I am proud to say that Marhaba Bazaar features the greatest number of unique mission objectives and dynamic mission paths of all the levels in UNIT 13.
Mission Design Closing Time
Picking up the pieces in the Adjikistani Embassy and Thahabi Village.
Repeat Inheritor
With Marhaba Bazaar generally sorted I inherited the Adjikistani Embassy and Thahabi Village levels. These levels were in different states of progress so I began by adding or fixing bugs with the essentials on both:
- AI Restriction Zones
- AI Sleeper Zones
- Co-Op Blockers
- Navigation Arrow Mesh
- TAC MAP Zones
- Extraction cinematic scripting
Some Great Reward
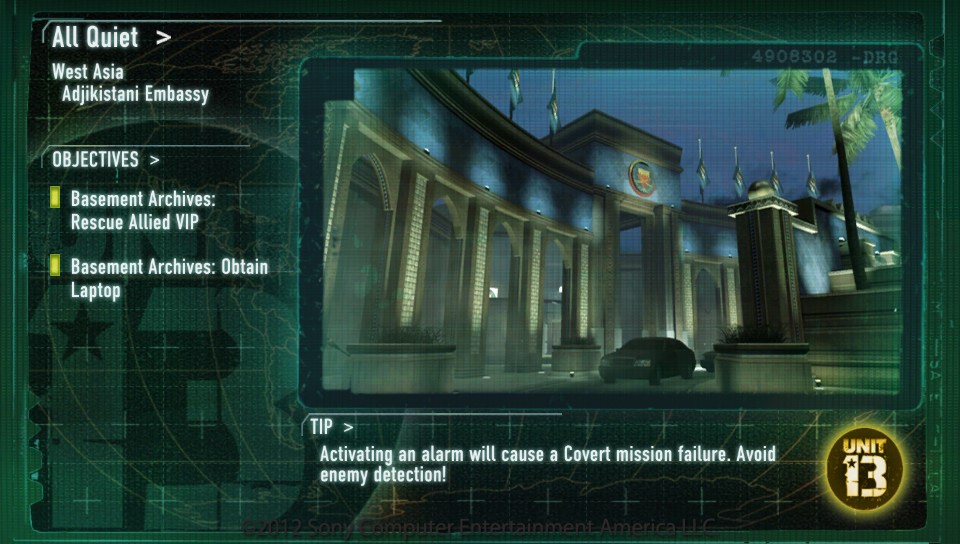
My "inheritance" also included quite a few bugs on the levels. After reading through them, I decided to tackle the Adjikistani Embassy level first.
Unfortunately, the level was art and fiction complete, so I couldn’t make any changes to the environment or move ranked objectives as I fixed the pre-existing bugs on ranked missions.
Most of the ranked mission bugs were fairly easily to fix, but the Covert mission "All Quiet" required a complete reworking of the enemy AI to make it possible to complete while maintaining stealth.
Once I felt better about the ranked missions, I added as many unique mission layouts, non-mission specific objectives, threats, and alternate sets of enemy AI as I could to increase the number of potential dynamic missions. As with Marhaba Bazaar, I took the time to test the Covert variants and removed any troublesome enemy AI sets or objectives from the Covert randomness pool.
Construction Time Again
The Thahabi Village level had just come out of the level design phase of production and contained only three encounter areas. A fair amount of the enemy AI was placeholder or missing and some missions were not completely implemented, so I began looking for other issues while adding and updating the various components of the level's missions. Of everything I found, two were quite serious and I am thankful to this day that they were able to be addressed:
No Way Out
As I looked at some of the existing mission paths and considered my own,
I soon discovered that there were no places for the player to extract.
Adding openings in walls and animated doors to support extraction cinematics would require additional art support,
so I created a map not unlike the one I used in Marahaba Bazaar for monster closets to clearly show the artists
where I would need changes made for the extractions.
Thanks to the map and my explanation of the reason for the need of these changes, the artists on this level were very accommodating and opened up every area I needed. After this I added the appropriate cinematics and directed missions to use these new extraction locations as needed.
Lost in Transition
The Livestock Pens and Village Center areas were connected by two wide transition areas that sat side by side.
Unfortunately, these transitions allowed huge sightlines between the encounter areas and created a great number of sleeper zone bugs,
such as enemy AI going to sleep in player view.
I tried many modifications to the sleeper and restriction zones to fix these bugs, but the fixes were compromising the quality of the enemy AI by either forcing them to stay deep within the Livestock Pens or making it so they could not pursue the player around the central structure of the Village Center. To make matters worse, these fixes were not complete and there was always an angle or position where the bugs could be reproduced from.
It was a scary request to have to make, but after attempting various fixes I felt the best way to move forward was to change the shape of the transition area. I created a crude drawing of my plan and politely stated my case to one of the artists working on the level. He was initially hesitant as this was a big change and time was running short, but my case was airtight and he kindly agreed to update the transition. In addition to this I also requested a couple variants of existing blocker assets for the doorways used throughout the level to prevent any other sleeper or sightline issues.
The artists on this level really came through and saved me with these changes. The updated transition area blocked all of the sightline issues and I was finally able to update the sleeper zones to allow maximum enemy AI freedom in each encounter area.
Don't cry for me Thahabi
Once I got the ranked missions sorted and fully working with enemy AI and threats I turned to the dynamic missions. I once again added as many non-mission specific objectives as I could along with unique mission paths and sets of general enemy AI to increase the potential number of random missions.
By this point I had been working a lot of 90 plus hour weeks to try and keep up with any bugs on Marhaba Bazaar, Adjikistani Embassy, and finish the missions on this level so unfortunately I didn’t have the time to document all the objectives or mission layouts and sadly I don’t remember just how many dynamic variants I created.
But I do remember enjoying working on Thahabi Village a great deal, and the missions from this level featured prominently in launch trailers and early press materials. To our credit many levels were video ready when the teaser trailer below was released, but it uses only Thahabi Village in addition to the previously announced Anu Airbase. So I may not have been sleeping enough, but I know with the support of the level’s artists we knocked this one out of the park!
Mountainous Missions
Here are some comments on a couple missions I do remember well.
Covert "Reticent Hawk"
Not long after I inherited the level the lead designer asked if I could focus on updating the ranked Covert mission,
as playtesters had reported it being too difficult and some could not even finish it.
After looking at the possible routes through the encounter area and enemy AI placement I moved a few enemies around and updated their patrols and timing to create an easy path through the mission with several obvious safe resting areas.
The lead designer was very happy with the changes as it was now exactly what he wanted difficulty-wise for the first Covert mission in the game. Thanks to some scoring chain opportunities I added intentionally and a few "happy accidents" this mission also started a friendly scoring rivalry between several disciplines!
High Value Target "Vanished Wizard"
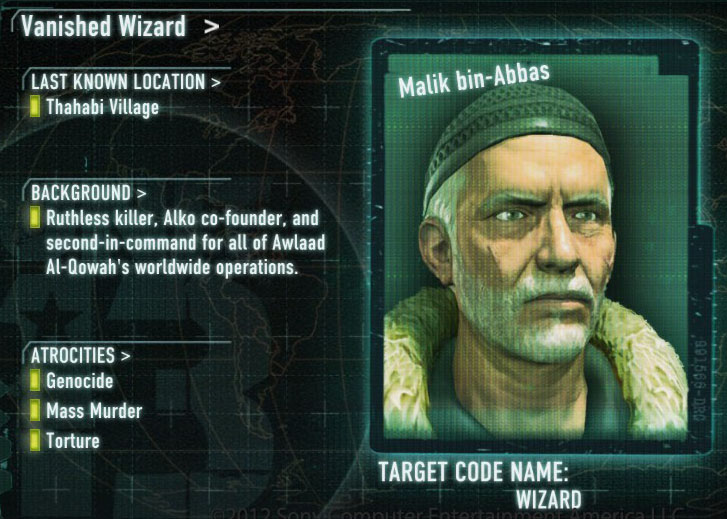
I do not recall the exact reasons behind what happened, but I was asked to make this mission as hard as I could. Maybe not the best request to make of someone who held the platinum trophy on Demon’s Souls and was playing Dark Souls at the time???
Challenge accepted! This mission is popularly considered the most difficult in the game.
Even though Thahabi Village only has three encounter areas, I created a gauntlet for players to run that demands a high level of skill and has generated a fair amount of positive and negative message board posts. Some attest that the enemies respawn indefinitely...but that is not quite true. At least I don’t think we could do that!
There definitely were a lot of reinforcements used in this mission, but I don’t believe there was anything cheap or unfair. Besides, its seemingly overwhelming challenge just makes victory all that much sweeter once it is achieved.
I also added an Easter egg involving the high value target himself, but I wonder if anyone has ever seen it before killing him?
Design On Demand Support
Providing care and service up to and after the sale.
Cover Markup
Throughout UNIT 13 most of the remaining designers stepped up to pitch in wherever they could to help spread out workload. I did my part initially in a familiar area.
I was once again called on to do cover markup passes on the environments, but this time I was able to wait until they were fairly complete from an art standpoint.
The lead designer wanted cover on everything regardless of usefulness so that the feature would not appear broken or missing anywhere in the game. This meant a lot more cover points to place, with the average number of cover points per level increasing to over 2,000 for those with four encounter areas. (In SOCOM 4 the average was just over 800.)
Unfortunately, the need for me to take over mission design on the Adjikistani Embassy and Thahabi Village levels meant I needed to start training a replacement before I could finish adding cover to all the levels.
Before I handed cover off to him I had completed cover passes on seven of the ten environments, placing and tuning over 14,000 cover points in the process.
Training went well and he did a great job finishing up cover markup on the three remaining levels.
Testing 1-2-3
TAC MAP Tools
Thanks to my background in testing I was often the guinea pig for new tools and processes.
This began with the TAC MAP zone and creation tool.
This tool required designers to carefully place volumes around areas of the environment using the level editor. The placement of these volumes required absolute pixel perfect precision, but they did serve two purposes once properly positioned.
First, they would allow images to be taken of the area they enclosed. These images were given to a 2-D artist who created all the in-game maps from them.
Second, once the finished maps came back from the artist the volumes would determine the correct map image to display based on the player’s position.
After running through this process a few times and reporting all the bugs and usage issues I taught the rest of the design team how to use it.
Navigation Mesh
The navigation mesh was a designer placed matrix of points that flowed throughout all the encounter and transition areas of the level.
It powered the navigation arrow that appeared at the top of the screen and gave the player basic guidance by indicating the direction
to travel to take the shortest route to the active objective.
I believe this tool was rolled out to all designers at once, but I quickly found crashing bugs and was able to save the work of several designers by letting everyone know what not to do.
This tool also resulted in some bugs with certain objectives, and after discussing the possible reasons the technical designer and I determined that the code behind it was failing to read the mesh if the player was not on a node at the time an objective was completed. We took this hypothesis to the engineer working on it and he validated it and fixed the issue, saving all the mission designers from countless bugs.
Fully Seeded
The Daily Challenge feature was a fabulous addition to the social component of the game. Each day a different dynamic mission would be available for players to take on, but they only had one chance to play it and hope that their score would hold up. This gave anyone a shot at being number one on the leaderboard and gave players a reason to come back every day to take on the next mission.
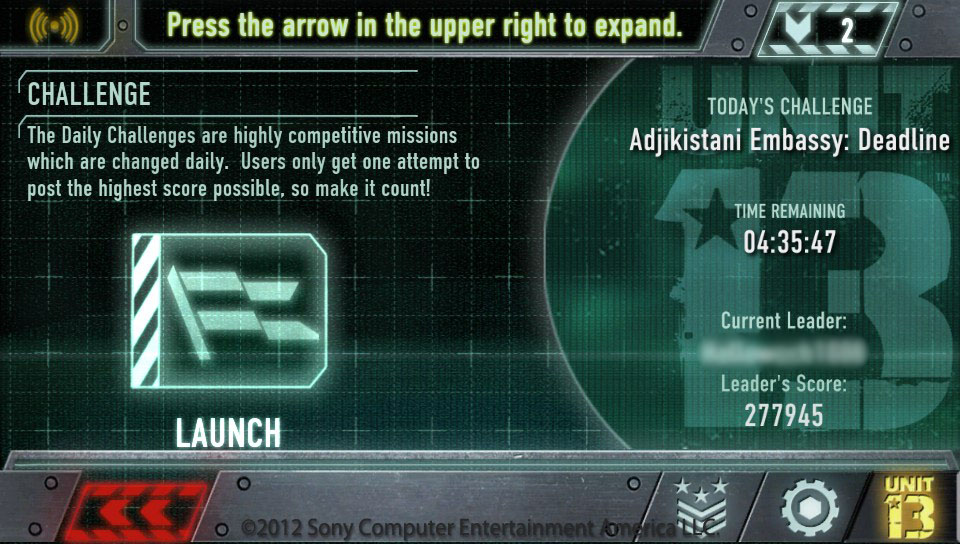
All it needed to function was mission seed data, which was generated in part by the whole design team. This started off with everyone replying to an email thread with new seeds, but it quickly became difficult to know what missions had enough seeds, if any. To help make things a little easier I created an Excel spreadsheet with all the seeds from the email thread, all the ranked objectives for each mission, and images of the insertion points for the seeds.
As a team we quickly generated two seeds for every mission, then I took over and harvested anything else that was needed to give us four seeds per mission. After this I ordered the missions to keep similar game types or environments from appearing too often and added all the data into an XML document.
I then tested all 144 seeds by advancing the date on a development kit one day at a time and making sure that the expected mission loaded and did not contain any obvious bugs. After making and testing a few changes I submitted the file as what would become my final check in for UNIT 13.
SXSW
To support the launch of UNIT 13 I flew to the 2012 South by Southwest (SXSW) festival to meet with gamers, promote the title, and show off the PlayStation VITA.
During the briefing for the trip at Zipper I learned that I would be running a contest in which players would compete for the highest score on the first mission of UNIT 13, with the winner receiving a brand new VITA.
This was a great prize, but I wanted to sweeten the deal and give everyone who participated something to remember the event by. So I spoke with HR and acquired about one hundred mini-flashlights branded with the Zipper Interactive logo and two copies of UNIT 13. I had the entire studio sign the copies and packed everything up for the trip.
The competition was a great success, as everyone got a flashlight and both the winner and runner up received the signed copies of the game. Of course, the winner got that shiny new VITA as well.
In Memorandum
In just over two years I managed to ship two games as a key member of the design team at Zipper Interactive.
While I am sad to this day that I am not still there making great stuff with great people, if it had to end I am glad it did with UNIT 13. The lead and technical designers came up with a great framework that supported the amazing missions, levels, and gameplay that the rest of us (artists, audiophiles, designers, and engineers) created.
The game more than fulfills every one of its mission objectives and easily earns a five star ranking.
Though the story of Zipper Interactive ends here, mine picked back up at Turn 10 Studios with
Forza Motorsport 5.![]()
Overall Contributions
The following is a simple "one-look" outline style list of everything I worked on in UNIT 13 as a designer. For more detailed information, please click the "Design Works" tab.
Level / Mission Design and Scripting
- Marhaba Bazaar
- "Free Market" Direct Action
- "Crazed Bullet" Covert
- "Restore Blue" Elite
- "Merciless Cobra" Deadline
- "Scorpion Crush" High Value Target
- Adjikistani Embassy
- "Altered Sanction" Direct Action (Took over mid-production)
- "All Quiet" Covert (Took over mid-production)
- "Last Sunset" Elite (Took over mid-production)
- "Spring Clean" Deadline (Took over mid-production)
- "Grifter Expel" High Value Target (Took over mid-production)
- Thahabi Village
- "Desert Rift" Direct Action (Took over mid-production)
- "Reticent Hawk" Covert (Took over mid-production)
- "Green Honcho" Elite (Took over mid-production)
- "Broken Tribe" Deadline (Took over mid-production)
- "Vanished Wizard" High Value Target (Took over mid-production)
Gameplay Design
- Elite Game Type
- Member of strike team that determined the parameters of the Elite game type
Systems Design
- Co-Op System
- Prototyped "Co-Op Blocker" system
- Cover System
- Researched and presented impacts of the removal of the standing stance in regards to cover
- Completed cover markup passes on seven of the nine environments
Navigation System
- Performed implementation testing of the navigation mesh and tactical map creator tools
- Provided feedback on the tools and offered suggestions on ease of use improvements
- Taught other designers the purpose of the tools, how to use them, and pitfalls to avoid
Scoring System
- Researched other games use of scoring mechanics and UI visuals
- Created multiple mockups of potential visual scoring displays